The Christmas Tree Workout!
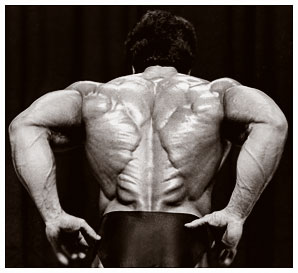
In light of this fun and festive Christmas season, I figured I’d write an article on a unique shape that many bodybuilders strive to get within their lower back region. When the lower medial portions of the lats meet, they form a “Christmas tree-like” shape due to the muscle fiber striations of the lats. The Christmas tree can be seen extremely well in those people with well developed lower lats and erector muscles, as well as a low body fat percentage!
This workout is designed to target the two major muscles that form this Christmas tree shape: the Erector Spinae and Latissimus Dorsi.
***It’s important to note that unlike the smaller muscles that make up the upper body like the biceps and triceps, the lats and lower back can take heavier loads and therefore require more discipline and control to correctly stimulate them into growth. Don’t be afraid to train them HARD! This isn’t planet fitness people…you might let out a few grunts here and there***
CHRISTMAS TREE LATS!
This workout is composed of 3 main exercises and 1 bi-set to finish up.
Exercise 1:
Sternum Pull-Ups (5 sets – 8 to 15 reps)

Explanation: For those of you who aren’t quite sure what this exercise is then let me explain a little. In a typical pull up the body will remain in a relatively straight line up and down perpendicular to the floor; with sternum pull ups your weight is shifted slightly backwards almost into a “rowing” position. This allows a tight contraction of the majority of the lower fibers of the lats. If you cannot use your own body weight, try elevating your feet with a box of some sort and pull yourself into the same position using the bar on the smith machine.
Exercise 2:
Overhand Barbell Rows (4 sets – 10 to 12 reps)
Explanation: This exercise can easily be done incorrectly if you don’t pay attention. The arms are part of this movement however they should not be responsible for the weight moving back and forth; and the reason I say “back and forth” is because the bar shouldn’t just be moving straight up and straight down. On the descent, the arms will slightly lengthen forward and on the return the elbows will drive backward AND up as far as they can. Just picture the bar coming up to your belly button, no higher. You should feel a strong contraction in the lower lats (Christmas Tree).
Exercise 3:
Seated Row Machine (4 sets – 10 to 15 reps)

Explanation: This exercise can be done with a variety of different grips however your focus will still remain on the lower part of your lats. This means that your grip will stay in a more narrow position instead of a wide row. The key to this exercise is to not elevate your shoulders during the movement whatsoever. This movement consists of RETRACTION of the shoulder girdle NOT elevation and depression. Try placing your thumbs around with your other fingers to grip the handle. This will take tension out of the arms and place it onto the lats where you want it.
Exercises 4 + 5 (Bi-set):
Deadlifts + Straight Arm Cable Pulldown (4 sets of both exercises back to back – 10 to 15 reps each)

Explanation: Deadlifts should be your bread and butter. Nothing fancy about doing this exercise. My advice is to always learn proper form before trying heavier weights. Since this is a bi-set, the weight will not need to be as heavy as if you were performing it by itself. To place more emphasis onto your back and not your legs, bring the bar down just below your knees but NOT to the floor, and return to the starting position squeezing your lats and lower back muscles.
The straight arm cable pulldown will be your “finishing move.” To perform this correctly, the tension should STAY in your lats the entire time, nothing in the shoulders. The triceps will be in partial static contraction during this movement so if you feel in on the back side of the arms then don’t worry.  Remember to lead with your elbows and not your hands. The contraction is happening in your BACK not the arms. Feel free to use a rope or a bar attachment!
